Tutorial: Configuring emails and text notifications sent by planyo (3 / 6)
Tutorial Table of Contents
part 1: Default setup for new planyo sitespart 2: Reservations entered by the administrator
part 3: Customizing the default setup
part 4: Messages sent before or after arrival
part 5: Using text messages (SMS)
part 6: Global email header/footer
Part 3 of 6: Customizing the default setup
The default setup works well in simple cases but you will likely want to customize the messaging system.
First of all you may want to change the FROM field of the emails sent by planyo. You can see how this is done in in Q188. You don’t need to do this if you want to fully customize your emails (full customization lets you also set the FROM field for each individual message).
Another thing you may wish to change is getting rid of the email verification step. This is the default for newly created resources. To change this, either change the value of the resource setting email address verification to never required or make the email field in the reservation form not required (Planyo understands that if the email field is not obligatory no verification should be required even if the email is entered).

Getting rid of the email verification step And finally, we have the most important customization possibility, the Notification settings page which you can access from the Settings tab.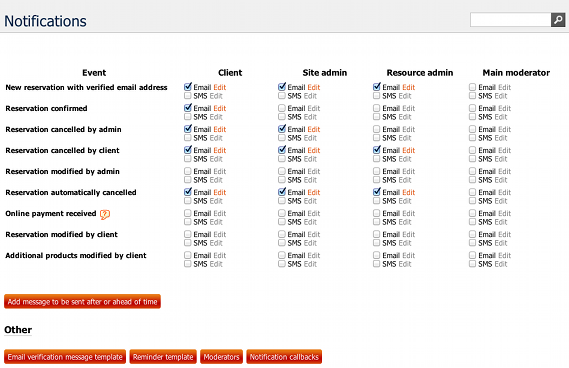
Notification settings page Here first of all you can use the checkboxes to switch on and off specific notifications sent for specific user role. There are four user roles from the point of view of the notifications: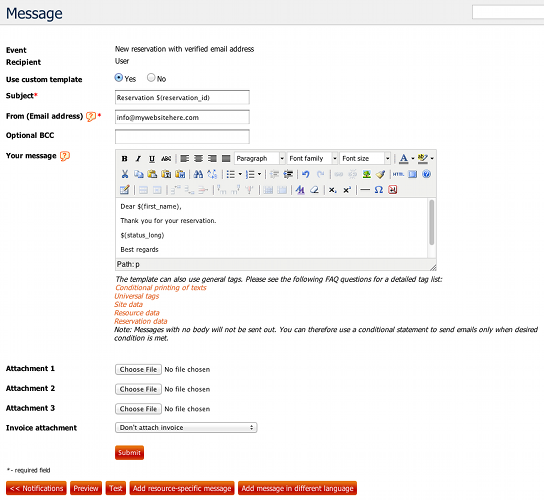
Customizing email notification Here you can completely customize a given notification email, including the FROM and BCC fields. You can also attach documents to the email or have the invoice attached to it (the invoice can be also customized in Site settings / templates). The subject and message body can also include a wide number of planyo tags which represent things like reservation ID, resource name etc. Practically all information associated with the planyo site, resource selected or the reservation can be extracted using the tags. You can for example write: Dear $(first_name), Your reservation number is $(reservation_id). This will be replaced by planyo by the actual data, e.g. Dear John, Your reservation number is R100. Please see the links below the message body for all the tags. You can also use conditional statements (more about this in Q207) if you want to include text conditionally, depending on any criterium. For example, if the customer already made a payment you may want to write a different message than if no payment was made. This mechanism also lets you conditionally send out the entire email or not. Planyo will never send out emails with empty body, so if you have a conditional statement which will only write text if a certain condition is met, if it’s not met, no email will be sent out. See Q256 to learn more about the tags you can use, including conditional tags. At the bottom of this page you can preview your message (on the screen), test it (planyo will send a test email to your email address) and define a different message in another language or for a specific resource. In such case the original message will be the default message, meanning it will be used only if no specific message is defined (based on the language or resource). For example if you define different language versions of the messages (e.g. Italian and French but not German) and a customer makes a reservation using another language (e.g. German), then the default message will be sent to this customer while the French version would be sent if the customer had reserved using the French language. The same is possible with respect to specific resources. When you’re happy with your message, click Submit to go back to the notifications page. Here you can also click the Reminder template button at the bottom of the page in order to customize the reminder email which can be sent when requested by the customer.
Getting rid of the email verification step And finally, we have the most important customization possibility, the Notification settings page which you can access from the Settings tab.
Notification settings page Here first of all you can use the checkboxes to switch on and off specific notifications sent for specific user role. There are four user roles from the point of view of the notifications:
- Client: the client whose email address is associated with the reservation
- Site admin: main administrator of the planyo site
- Resource admin: if you have separate administrators for individual resources, they may also receive notifications for the resources they administer
- Main moderator: this is one of the additional moderators specified in Site Settings / Add, remove moderators. You can only select one moderator as the main moderator and only he/she will be able to receive notifications, other moderators will be able to moderate the site but no emails will be sent to them.
Customizing email notification Here you can completely customize a given notification email, including the FROM and BCC fields. You can also attach documents to the email or have the invoice attached to it (the invoice can be also customized in Site settings / templates). The subject and message body can also include a wide number of planyo tags which represent things like reservation ID, resource name etc. Practically all information associated with the planyo site, resource selected or the reservation can be extracted using the tags. You can for example write: Dear $(first_name), Your reservation number is $(reservation_id). This will be replaced by planyo by the actual data, e.g. Dear John, Your reservation number is R100. Please see the links below the message body for all the tags. You can also use conditional statements (more about this in Q207) if you want to include text conditionally, depending on any criterium. For example, if the customer already made a payment you may want to write a different message than if no payment was made. This mechanism also lets you conditionally send out the entire email or not. Planyo will never send out emails with empty body, so if you have a conditional statement which will only write text if a certain condition is met, if it’s not met, no email will be sent out. See Q256 to learn more about the tags you can use, including conditional tags. At the bottom of this page you can preview your message (on the screen), test it (planyo will send a test email to your email address) and define a different message in another language or for a specific resource. In such case the original message will be the default message, meanning it will be used only if no specific message is defined (based on the language or resource). For example if you define different language versions of the messages (e.g. Italian and French but not German) and a customer makes a reservation using another language (e.g. German), then the default message will be sent to this customer while the French version would be sent if the customer had reserved using the French language. The same is possible with respect to specific resources. When you’re happy with your message, click Submit to go back to the notifications page. Here you can also click the Reminder template button at the bottom of the page in order to customize the reminder email which can be sent when requested by the customer.