FAQ Q383: How do I setup Stripe Terminal to accept on-site payments?
Sekcja: Integrations with specific payment gateways
For general information about accepting payments in Planyo see Q121: I'd like to accept credit card payments for the reservations.
 In the Planyo backend, the Stripe Terminal payment option is available at the bottom of the reservation details page. When clicked, the transaction amount is sent to the reader device for customer authorization.
The transaction status is automatically queried and displayed on the payment page. Once the transaction is successfully completed, a success message will appear.
You can then return to the reservation page by clicking the corresponding button.
If an error occurs during transaction authorization, an error message will be displayed on the payment page. For certain types of failures - such as insufficient funds or a card being rejected - you can simply
resend the transaction to the reader device for another attempt by clicking the button next to the message.
In the Planyo backend, the Stripe Terminal payment option is available at the bottom of the reservation details page. When clicked, the transaction amount is sent to the reader device for customer authorization.
The transaction status is automatically queried and displayed on the payment page. Once the transaction is successfully completed, a success message will appear.
You can then return to the reservation page by clicking the corresponding button.
If an error occurs during transaction authorization, an error message will be displayed on the payment page. For certain types of failures - such as insufficient funds or a card being rejected - you can simply
resend the transaction to the reader device for another attempt by clicking the button next to the message.
For other types of errors, you may need to restart the transaction by returning to the reservation page and clicking the Stripe Terminal button again.
Next, enter your Stripe API secret key, reader ID (see Register your reader below) and webhook secret (see the Webhook section below).
For example:
You can find your API credentials in the Stripe Dashboard. Click Developers (see the image below), then select API keys from the top menu: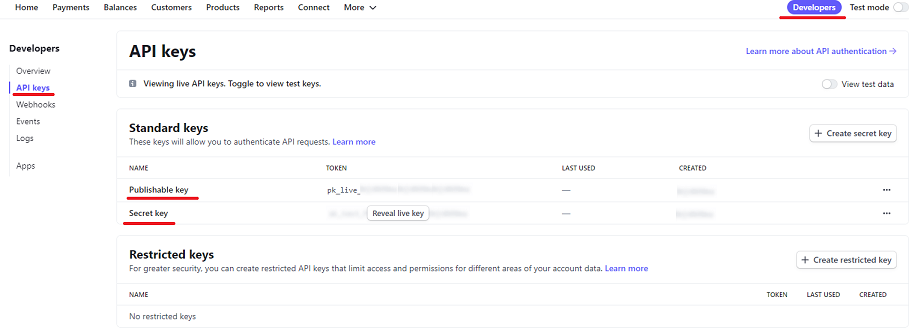 Instead of a full secret key (sk_live_...), you can use a restricted key (rk_live_...), which you can create in your Stripe Dashboard.
Restricted keys allow you to limit access to specific areas of your account for increased security.
Instead of a full secret key (sk_live_...), you can use a restricted key (rk_live_...), which you can create in your Stripe Dashboard.
Restricted keys allow you to limit access to specific areas of your account for increased security.
Make sure the restricted key has Write access to both All Checkout resources and Charges.
For test transactions, use your sandbox/test API secret key, reader ID, and webhook secret. Sandbox secret keys start with sk_test_... (or rk_test_... if using a restricted key).
Note: API credentials, card readers, and webhooks are registered separately for sandbox/test mode and live mode. Be sure to switch to your live credentials when you're ready to begin accepting real payments.
For live transactions, you must order a Stripe reader from your Dashboard. You can do this at https://dashboard.stripe.com/terminal.
Note: Planyo only works with smart readers, such as the Stripe Reader S700 or BBPOS WisePOS E.
For testing purposes, you can simulate transactions without a physical device by using Stripe's built-in simulated card reader.
If you have a Stripe Terminal reader, you can perform test payments using a physical test card. You can purchase physical test cards alongside readers from the Terminal tab in the Stripe Dashboard.
Note that physical test cards are only compatible with a sandbox environment. For more details, refer to Stripe's guide on physical test cards.
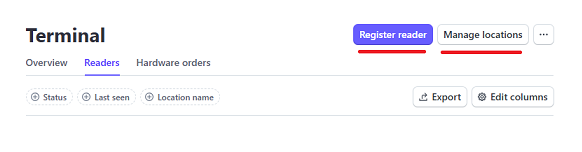
To register a reader in your Stripe account, go to https://dashboard.stripe.com/terminal/readers.
On that page, click Register reader and follow the steps in the Stripe reader registration guide.
Important: Each reader must be assigned to a location (country) that is supported by your Stripe account.
Otherwise, any payments processed through the reader will be rejected. For details, see the Stripe Terminal locations documentation.
.
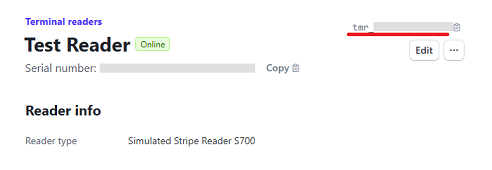
 Once the reader is registered, click on it in the list to view its details. Then, copy the Reader ID, which starts with the prefix tmr_.... You'll find it in the top-right corner of the reader details page.
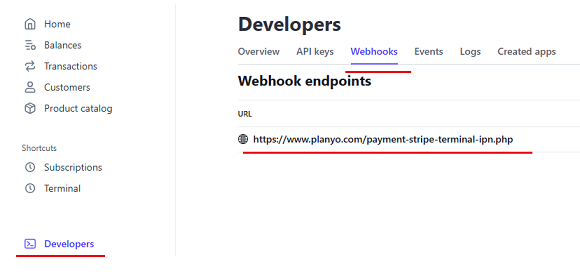
 You can set up the webhook in the Webhooks section of your Stripe Dashboard:
 Click Add endpoint to open the form where you can configure the webhook settings.
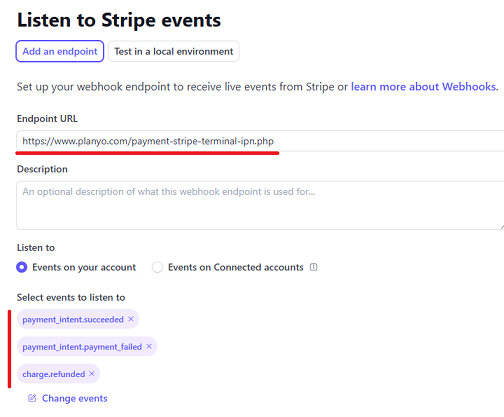
In Endpoint URL enter: https://www.planyo.com/payment-stripe-terminal-ipn.php
Next, click Select events, and in the view that opens, choose the following events: payment_intent.succeeded, payment_intent.payment_failed and charge.refunded.
After selecting the events, click Add endpoint to save your settings. Once the endpoint is added, the Signing secret section will appear at the top of the page (see the screenshot below).
Click Reveal to display the webhook secret, and copy the value.
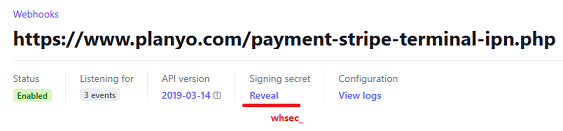 Next, return to the Online payments page in your Planyo panel and enter the webhook secret value in the Webhook secret field. The webhook secret always starts with whsec_.
This secret is required to authenticate events sent from Stripe to our system securely.
Next, return to the Online payments page in your Planyo panel and enter the webhook secret value in the Webhook secret field. The webhook secret always starts with whsec_.
This secret is required to authenticate events sent from Stripe to our system securely.
Stripe Terminal allows you to accept in-person payments using card readers designed and manufactured by Stripe. You can order a smart reader directly from your
Stripe Dashboard, enabling your customers to pay on-site using credit or debit cards.
Note: Unlike other payment methods available in Planyo that can be used online, Stripe Terminal payments can only be initiated by an administrator or moderator through the Planyo backend
(see Using Stripe Terminal below).
Using Stripe Terminal
With Stripe Terminal, customers use their credit or debit cards to authorize transactions on a reader device. Since the reader can process only one transaction at a time, the payment must be
carried out on-site by an administrator or moderator.
For other types of errors, you may need to restart the transaction by returning to the reservation page and clicking the Stripe Terminal button again.
Credentials
First, select Stripe Terminal in the Payment processing site field on the Site settings / Online payments page.
Secret key: sk_live_BQokikJOvBiI2HlWgH4olfQ2
Reader ID: tmr_GUir3guk2Yiwo9
Webhook secret: whsec_Yq3Tc6fP4556XLdfgM9WHmjmo1r2
You can find your API credentials in the Stripe Dashboard. Click Developers (see the image below), then select API keys from the top menu:
Make sure the restricted key has Write access to both All Checkout resources and Charges.
Register your reader
To use Stripe Terminal in Planyo, you first need to register a reader device in your Stripe account.
Note: Planyo only works with smart readers, such as the Stripe Reader S700 or BBPOS WisePOS E.
To register a simulated reader, use one of the following registration codes when registering the reader: simulated-wpe or simulated-s700. These codes create a simulated WisePOS E or
Stripe S700 reader in a sandbox environment only.
Refer to the Stripe guide for more details.
When you set up a simulated reader in Planyo (along with a test secret key), you'll see two simulator buttons on the payment page in the backend. These allow you to test both successful and failed card transactions.
This lets you test the full payment flow without needing a physical card or terminal device.
Webhook
You need to create a Stripe webhook that points to the endpoint on our server. This allows us to receive real-time updates about your transactions and automatically associate payments with
the corresponding reservations in Planyo.
In Endpoint URL enter: https://www.planyo.com/payment-stripe-terminal-ipn.php
Stripe requires your account to have a name set in the Dashboard. To verify this, go to your Stripe admin panel and ensure your account name appears in the top-left corner of the page.